Wednesday, January 30, 2013

Our Family Room with Storage Solutions

Hey there!

Have you ever wondered what to do with all of those household items around your home?
Well, in our home, we lack built-in storage so we have to get creative!
In our family room, for instance, we don't have closets or built-ins or shelves...but we needed some kind of storage solution because we have a ton of things that need a place to live, you know?
So, over the past year, my family and I have been thrift shop hunting around our area to find the perfect storage solutions for items in our family room.

In this post, you will see several examples of what we used to store things like books, movies, toys, left-over fabric, etc and I hope you get inspired to do the same in your home. :)

To start, I just took some pictures of our family room so you get a better idea of the space and its function.

The mirror over the fireplace was a neat find from The Home Depot Martha Stewart Collection.
I used a gift card to purchase it so it was a deal to me!
I will talk about the book cases and the floral patterned chair later on in this post...they have a neat story to tell.


 If you are like me, you enjoy taking tons of pictures of all sorts of things. I love to photograph family, scenery, and pretty much anything that strikes my fancy.
But I also need a place to put those pictures on display, so I purchased these frames from Wal-Mart for $3.00 a piece a while back. I painted them white and hung them around the television. It's amazing what a little paint can do.


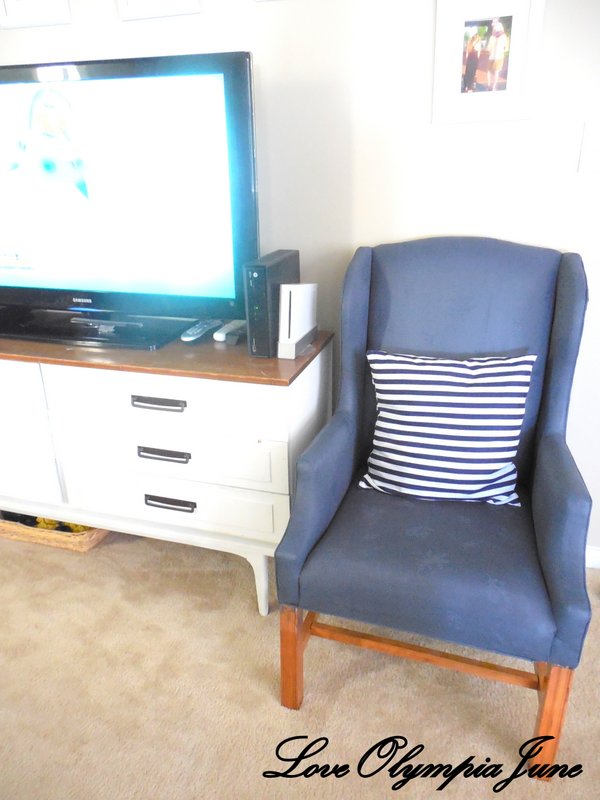
 The television stand holds a ton of DVD's, cords, batteries, and other electronic things that we didn't want out on display for everyone to see...especially our little ones. We had to make sure those items were stored safely away so we purchased this T.V. stand from the thrift store and I painted the bottom white and kept the top in its original wood tone for visual appeal. I also gave the handles an update too with some spray paint.


Now these chairs are pretty special to me because they were thrift store purchases that I absolutely love!!
Each cost under $25 and all I had to do was give them a makeover.
They work great in our family room because they provide the function of extra seating, which is something we desperately needed in this space.
To read more about the floral thrift store chair makeover, just click here.


I bought 2 of these armchairs at another thrift store in our area and painted them in a navy color and Voila! more seating in our family room was accomplished.


Some of these pillows were DIY projects and others were bought on clearance at Target. They serve as comfortable backings to our FREE couch!! Yes, I said a FREE couch! :)
The pastor of our church was getting rid of his so we quickly took it home and recovered it.


I love our fireplace mantle!
It's a great place to display family mementos like these owls my mom bought and our thrift store vase I painted a year ago.


And here is the bookcase my husband and I creatively put together ourselves! We are pretty happy about the way it turned out.
The top part is made from Target shelves and the bottom part is actually a dresser that we transformed. It works great as a base unit to our shelves.
And don't worry, it is safely nailed and attached together.
To read more about this project transformation, click herehere, and here.
:)

But this piece does a great job holding storage as you can see. And I love that it sits cozily next to our fireplace which makes it a great spot to curl up an read a book- especially on those cold nights!

 
And I will leave you with a few more pictures to enjoy of our space.


How do you handle to storage needs in your family room?


Thanks for stopping by!

Linking to:

http://amy-newnostalgia.blogspot.com/
http://thededicatedhouse.blogspot.com/
http://somedaycrafts.blogspot.com/
http://www.theshabbycreekcottage.com/
http://www.firefliesandjellybeans.com/

http://emilyaclark.blogspot.com/

Tuesday, January 29, 2013

Guest Room/Big Girl Room Update III

Howdy, howdy!
Don't know why I opened with that...just wanted to be different. ;)
Well, today I said I would share with you more pictures of the room transformation since I had recently changed out the curtains so that is what I am doing for today's post.

The original curtains we had in the room were blue bed sheets that I hung up using silver ring clips.
I didn't like the color combination of the curtains with the wall color and the hints of pink in the room, so I wanted to change those out.


Here is a picture of our daughter's wall shelf with some of her favorite books and some of our favorite pictures of her when she was an itty-bitty newborn! Feels like just yesterday when we held her for the first time after her birth....but that was 19 months ago!! Wow!


 In the future, I have plans to turn this wall into a personal wardrobe for our daughter's when they possibly end up sharing this room in the future.
I would also love to build a reading bench with storage underneath for them too!
But for now, we are keeping things real simple in the room just to be safe. :)


Okay, so back to the curtains.....
I swapped out the blue bed sheet curtains for some nice white curtains we had on hand.
I had forgotten about these curtains as they weren't in use at the time when I found them so I figured they would be a great fit in our daughter's room.


Here are the new curtains after they were hung up in the room...I like the feel of them much better than the blue ones we had before.

And here is one of our little cuties playing on her bed with one of her pajama friend dollies. :)


 This room gets a good amount of natural light which we love and it was important for me to keep that feel the same when decorating.


We also switched out the nightstand for something smaller and I moved the bigger nightstand into another room for more storage.

Again, there is much I would like to do with this room in the future, but for now, we are happy with keeping it simple and easy.


Thanks for stopping by!

Sunday, January 27, 2013

Guest Room/Big Girl Bedroom


Hi everyone!
Happy Monday!
Did you have a relaxing weekend?

We completed some errands, spent a few days with friends, and had a good time at church on Sunday celebrating the cool weather we have been having. Our church calls this celebration Winterfest and it is a good time to gather together to worship and eat....there were lots of chili and hotdogs and brownies!!!! :) Plus, for the kiddos the church rented a bunch of bounce houses that were set up in the gym, but unfortunately our daughters are too young to enjoy it but we had fun anyways. Here's to next years Winterfest activities!!

Anyways, today I wanted to share with you that we have recently finished painting the guest room/big girl bedroom and I have a few pictures uploaded to show you.

I have big plans for this room a year or two down the road, but there will be more on that later.

Here are some pictures to enjoy of the rooms transformation since this weekend.


I raised the poms up a little higher and closer to the ceiling so they are out of reach of our little ones.
We painted the room a mixture of Sherwin Williams Relaxed Khaki and Universal Khaki.
I moved the bed to a different side of the room and away from the window.

And recently, even though it is not pictured just yet, I changed out the blue curtains for some white ones we had on hand. I need to post pictures of that soon, too!


I can't wait to share with you the plans I have for this room in the future.
I hope to get that up and posted for Tuesday.

Have you been changing any rooms around in your home lately?


Thanks for stopping by!

Thursday, January 24, 2013

Guest Room Transformations

Hello all!
It's Thursday already! And...it is still super cold here. We might get some snow today or tomorrow which is always exciting.

I have some updates to share with you about our guest room.
Since we are expecting another little girl soon...and SOON...we have been preparing our firstborns new room. Our guest room will become our oldest daughters big girl room which she will have all to herself...at least for a few years or so. ;)
This room has gone through quite a few changes over the past year and a half. I know, it sounds crazy that we haven't even lived in our home for 2 years and I have painted this room 3 times!!!! Cruhazyy!
Anyways, I don't have pictures to show of what the room looked like the first time I tried decorating it, but just image light blue and dark blue stripes on one wall and the rest of the walls were white. I was kind of going for a seashore type of decor at first, but that just wasn't working.

Then, I painted the walls gray and went with a gray and yellow themed room. It was nice for our guests, but it's not what I was going for for our daughter. So...now we are painting it a mix of Sherwin Williams Universal Khaki and Relaxed Khaki. The color is very neutral which will be nice for adding any kind of accent colors to the room.

For more on what the room use to look like you can click here and here.
While we loved it, it just wasn't something I wanted for my daughter...so we are going with something a little more cheery.

Here are some updates to share with you.
There is still lots to do so keep that in mind.


 Some of the poms were made by me a while ago and the other colorful ones were made by a friend- she used them for my baby shower and they were just too cute to not use in this room!


The curtains are actually bed sheets that no longer fit our new bed.
I still have to hem them and iron them, but I think the color will look good in here with the other accents.


So like I said, there is still a TON left to do.
We are hoping to get this room completed within the next couple of weeks.

I still need to hem and iron the curtains...
Need to add a few more accessories to the space...
Work on getting the closet organized (no pictures of that yet)
I still need to finish painting...
I want to hang the poms higher and closer to the ceiling...
And that might just about do it with this space...
Oh! and we need to work on getting our sweet little one to recognize that this will be her new room with her very own big girl bed!  :)

Are any of your little ones transitioning to a more "big kid friendly" space??

Thanks for stopping by!

Wednesday, January 23, 2013

How Far We've Come...

Hi there!

How was your Tuesday?
It is cold here where we live and we are hoping for more snow Thursday or Friday. :)
We don't get snow that often so it is nice when we do have it because the novelty hasn't worn off yet. It's also nice to have snow and cold weather just a few months out of the year instead of 4-5 months out of the year! Yippee!!

Well, like my title says, I wanted to show the transformation that our family has had since the past year and a half. We have gone through quite a few changes since living in our house and it always amazes me how much a room can change when you tweak it often, as I always seem to do. :)


So this is part of what we started with when we moved into our house.
I had an idea about using these Target bookshelves to add to a dresser to make one big storage unit.
I also added slipcovers to the armchairs and tweaked the mantle a little bit.
You can read more about the shelves here and also here!


Then we added a mirror from Home Depot above the fireplace and worked on setting up the storage unit so it would be a little more sturdy.


Then I decided to paint the armchairs in a navy color by Home Depot, the Martha Stewart collection.
This post goes over how I painted the armchairs as well as this post. 


Around Christmastime, we had added the navy armchairs and newly covered ottoman to the space.


And we finally completed the bookshelves by adding molding to the middle and pictures to the front to give it more character and to make it look like one big piece of furniture.
I also changed the shelf styling a bit and have been tweaking that area here and there.
You can read about that here in this post. 


So how do you decorate your family room?
Do you move things around every now and then?


Thanks for stopping by!

Tuesday, January 22, 2013

A Basic Fondue Recipe


Hi there and good morning!
I hope everyone had a wonderful weekend and a great start to the week.

Ours was pretty busy as we are gearing up for the arrival of another baby girl...we also enjoyed our time with some friends this weekend at their house on Sunday and their lovely array of pets which our daughter LOVED! Our friend cooked us a nice meal (including chicken cordon bleu) and later we had dessert and ice cream. "Yummy, yummy!" (That's what my daughter always says when it's time to eat!)
On Monday, we had more friends over for cheese fondue and later had delicious brownies to end the night.
I wanted to share the cheese fondue recipe with you because it turned out to be pretty tasty. All you need is some bread, diced apples, and vegetables to go with the fondue and you are set!

Here are the ingredients you need to start:


Now I tweaked this and didn't add as much cheddar cheese as the recipe calls for, and it still turned out great!

In a medium saucepan (or fondue pot) over low heat, mix together milk, Worcestershire sauce, ground dry mustard, garlic and flour. Heat until almost boiling. Gradually stir in Cheddar cheese. Continue heating until all the cheese has melted. Keep the mixture warm and melted in a fondue dish.

Basic  Fondue Recipe 

Enjoy!!

This recipe was found (or I shall say my husband found it!) on a website called allrecipes.com.
Hurray for good finds!

Have you made anything in a fondue pot recently?

Thanks for stopping by!

Friday, January 18, 2013

Final Reveal of the Half Bathroom

Yippeeee!!!
It is time to reveal the half bathroom with our floating shelves installed and the new decor.

 Since I already went through a little bit of the process on how to install the floating shelves yesterday, I figured I would just post the pictures for you to see the end result.
:)

We are pretty happy about the way it all turned out!


I may not be the best styler of bookshelves, but for my first time I loved the way it turned out.
Plus, these kinds of things can always be tweaked later on. :)


YAY! I love them!

Much better than what we had there before.

Any exciting plans for the weekend folks?
Hope you have a wonderful Friday and a fabulous weekend!


Thanks for stopping by!

Thursday, January 17, 2013

Half Bathroom Progress....Shelves


Good morning everyone!
After all of this rain, it is a bit chilly here on the east coast.

With that said, I have been able to buckle down and get some of my projects finished and the pictures edited.
First up is our half bathroom which was in need of a little bit of TLC.
It is a really small space, as you will see in the pictures, but I had been wanting to add wall to wall shelves in there for more storage.
I saw this idea of floating wall to wall shelves on another blog called A to Z home stories and was sold! I knew that was exactly what would help solve the storage issues in our half bathroom.

For today, I have some pictures of the process on how we got our shelves up but will save the other pictures of the decorating and final outcome for tomorrow. :)


Above and below are the before pictures of the bathroom.
Isn't it teeny-tiny?! Well because of that, we don't have a ton of option for storage so hanging wall shelves was a great way to go!

Plus, it gives us options to display little nick-knacks that family members have given us over the years.


The lighting in this space isn't great either, but I tried my best to get pictures good enough to post.


 Here is the first wall shelf up and ready.
We wanted to hang 3 of them so we started with our bottom one first.
All of the wood was purchased at Home Depot for about $10.00.
I had the guys cut the wood at HD for free and believe we used one piece.
It measures about 33" from one wall to the other and thankfully the Home Depot guys cutting skills were pretty precise.


 I will spare you the details of how we hung each shelf, but will give the basics.
We used what is called a toggle bolt to help anchor the nails and the corner braces in place- this also makes the shelf sturdy to place things on.
And my hubby drilled 3 holes in the walls for each shelf so we could place our corner braces on the bottom of the shelf.


Here you can see the corner braces a little bit better.
We used one corner brace and toggle bolt on each side of the wall shelf and another for the back of the shelf to give more support.


And in case you are wondering, the paint color we used is called Sea Salt by Sherwin Williams. It's a beautiful green-blue that changes with the lighting as you can tell in these pictures!


Stay tuned for more.
I would love to find out if you have ever hung floating wall shelves before too!


Thanks for stopping by!